Friday, July 31, 2015

Manual of Airborne Topographic Lidar - Chapter 2 Acronym Glossary

One of the most challenging things about reading this text is the incredible number of acronyms used.  I created the following glossary of acronyms to enable me to make sense of what I read in chapter two.

Glossary of Acronyms

  • ALS - Airborne Laser Scanning
  • AM - Amplitude modulation 
  • AOBD - Acousto-optic beam deflector
  • AOL - Airborne Oceanic Lidar
  • AOI - Angle of incidence
  • APD - Avalanche photodiode
  • ARD - Automatic rendezvous and docking 
  • ARV - Autonomous robotic vision
  • ASC - Advanced Scientific Concepts (company) 
  • ASPRS -  American Society for Photogrammetry and Remote Sensing
  • ATM - Airborne Topographic Mapper 
  • ATR - Automatic target recognition 
  • BATC - Ball Aerospace and Technologies Corporation
  • CCD - Charge-coupled device 
  • CIR - Color-infrared
  • CMOS - Complementary metal–oxide–semiconductor
  • COTS - Commercial off-the-shelf
  • CW - Continuous wave
  • DEM - Digital elevation model 
  • DESDynI - Deformation, Ecosystem Structure, and Dynamics of Ice
  • DHS SBIR - Department of Homeland Security Small Business Innovation Research program
  • DSM - Digital surface model
  • DSP - Digital signal processing
  • DTM - Digital terrain model
  • EDME - Electronic Distance Measuring Equipment
  • ESFL - Electronically Steerable Flash Lidar
  • FDC - Frequency-to-distance conversion
  • FFPA - Flash-focal-plane-array
  • FM - Frequency modulation
  • FOR - Field of regard
  • FOV - Field of view
  • FPGA - Field programmable gate array
  • FW - Full waveform
  • FWHM - Full width half maximum
  • GmAPD - Geiger Mode Avalanche Photodiode
  • GPS - Global positing system
  • HLDA - Autonomous hazard detection and avoidance 
  • ICP - Iterative closest point
  • IFOV - Instantaneous field of view 
  • IIP - Instrument Incubator Program
  • IMU - Inertial measurement unit
  • InGaAs - Indium-gallium-arsenide
  • INS - Inertial navigation system 
  • ISD - Integrated scanner, detector
  • ISDT - Integrated scanner, detector, telescope
  • ISR - Intelligence, Surveillance, and Reconnaissance
  • ISS - International space station
  • LAPF - Laser Altimeter Processing Facility 
  • LAS -  Laser (file format) developed by ASPRS
  • LA-WASM -  large-aperture wide-angle scanning mirror
  • LIF - Laser induced florescence 
  • LINS - Laser Inertial Measurement system
  • LRF - Laser range finder
  • LVIS - Laser Vegetation Imaging Sensor
  • MASER - Microwave amplification by stimulated emission of radiation
  • MIR - Mid range infrared
  • NASA - National Aeronautics and Space Administration
  • NAVOCEANO - Naval Oceanographic Office
  • NOAA - National Oceanic and Atmospheric Administration
  • OMCMFNC - Organic Mine Countermeasures Future Naval Capabilities
  • PRF - Pulse repetition frequency
  • PROXOPS - Proximity operations
  • PRR - Pulse repetition rate 
  • RAMS - Real-time Aerial Mapping System
  • RASCAL - RAster SCanning Airborne Laser Altimeter 
  • RF - Radio frequency
  • RGB - Red-green-blue
  • ROAR - Rapid Overt Airborne Reconnaissance
  • ROIC - Readout integrated circuit
  • RVS - Raytheon Vision Systems (company)
  • SLICER - Scanning Lidar Imager of Canopies by Echo Recovery
  • SNR - Signal-to-noise ratio 
  • SWaP - Size, weight, and power
  • SWIR - Short wave infrared
  • TMFL - Topographic mapping flash lidar
  • TOF - Time-of-flight
  • TRN - Terrain-relative navigation 
  • UAV - Unmanned aerial vehicles 
  • UPS - Uninterruptabke Power Supply
  • UV - Ultraviolet
  • VIS/IR - Visible / infrared
  • VTUAV - Vertical takeoff unmanned aerial vehicle

Additional Resources

Tuesday, July 21, 2015

NodeSchool

In a previous post I described how I setup a virtual machine and installed Node.js on it.  The goal was to help a group of Summer student interns get started with both Node.js and Firefox OS app development by working on a web application created by a previous student intern.

That plan didn't work out well, as the application in question did not provide the kind of on ramp to the technologies we wanted to learn that I had hoped it would. Since Node.js is new to both the student interns and me, we all decided to look at the tutorials on NodeSchool, particularly learnyounode.

With node, and thus npm already installed, I added the learnyounode materials to my virtual machine with:
$ sudo npm install -g learnyounode
Running
$ learnyounode
brings up a menu:
with links to instructions for each of the 13 exercises in the tutorial.

I spent the morning working through the first 6 exercises, and created a github repository with my solutions.  I'm setting myself the additional goal of learning to write good clean JavaScript while I'm at it, so I installed JSLint:
$ sudo npm install -g jslint
And made every effort to minimize the number of warnings jslint reports on each of my solutions.  Using JSLint is almost like having an automated Douglas Crockford to look over your coding style, so I feel I'm in pretty good hands as I learn.

Learnyounode is a fabulous tutorial.  It moves you quickly and efficiently toward learning key ideas of important Node.js programming concepts by having you complete a series of well designed exercises.

I'm out of time for today, but the main concept I think I have finally begun to wrap my head around from the first 6 exercises is the concept of a callback, which I had to use in my solution to exercise 6.

Thursday, July 16, 2015

Notes from Section 2.1 of Manual of Airborne Topographic Lidar


Chapter 2 of the Manual of Airborne Topographic Lidar, titled "An Overview of ALS Technology", provides a broad introduction to the operating principles and key elements of Lidar, and then discusses the specifics of several existing Lidar systems. Since it contains 90 dense pages of information, I'll break my notes on it into several posts.


Operating Principles

  • LASER - Light Amplified by Stimulated Emission of Radiation.
  • Lidar works with light in electromagnetic spectrum from ultraviolet through infrared.
  • Wavelengths are chosen with regard to range-performance, atmospheric or water absorption, eye-safety, and reflectivity of lased materials.
  • Lasers are nearly monochromatic (they emit light within an extremely narrow band of wavelengths).
  • The emitted wavelength is a function of the material in which the light is stimulated, so wavelength vs. material tables can be produced, like this one:
  • When laser light strikes a surface, parts of the light are:
    1. transmitted
    2. absorbed
    3. reflected
  • The distribution of these 3 parts is a function of the lased surface and the wavelength of the beam (see graph below for example distributions of common earth surfaces).
  •  All lidar systems are comprised of 2 parts:
    1. transmitter emitting laser pulses
    2. optical receiver detecting backscattered pulse
    1. The illustration below shows a simplified model of the laser ranging principle:

      which is represented by the equation:
      Δt = 2R/c
      Δt is the time between when the laser pulse is emitted and when its backscattered pulse reaches the receiver. c is the speed of light, which is approximately 299700 km/s in the earth's atmosphere. Solving for the range, R, we get:
      R = Δt·c/2
      so the range is half the product of the elapsed time and the speed of light.
    2. The square wave idealization is not a very realistic representation of an actual laser pulse, which is much more closely modeled by a Gaussian wave like this:
      The text discusses in some detail how this waveform is analyzed to determine the pulse. One common way this is done is referred to as full width half maximum (FWHM), which is the pulse duration at 50% or more of its peak intensity. Two other common measurements are 1/e and 1/e2 (shown in the above illustration) of peak intensity.

    Additional Resources

      Wednesday, July 15, 2015

      Learning Leaflet 1


      Leaflet is a free software JavaScript library for creating web mapping applications.  Since the Photovoltaic Viability Map project uses it, it's time I learned how to use it as well.

      Using the following three resources:
      I created a web page with a map displaying the area around where I live:

      Which rendered in a browser produces this:

      Lessons Learned

      From The Basics page on the SWITCH2OSM site, I learned that there are two components to a web based map application:
      1. A database of 'tiles' which are rendered (usually in 256x256 pixel sections) side by side to make the map.
      2. A JavaScript API for viewing the database tiles.
      While the OpenStreetMap (OSM) tiles are open data, and are thus free to use, the serving of them is not. Given the cost of maintaining and serving 46 gigabytes of data to the whole world, this is understandable, but I never thought about it before. OSM has a usage policy for their tile servers, which also suggests alternative tile servers for their tiles.

      So to setup a web map application that uses OSM tiles, one has two choices:
      1. Download the OSM database and generate the tiles yourself.
      2. Use a third-party supplier (some charge, some don't).
      The German company Geofabrik hosts the OSM database separated by regions, countries and states (within the US) in North America here. So instead of the 46 gigabytes of the entire OSM database, I could get just the 211 megabytes for the state of Virginia here.

      A content delivery network (CDN) is a distributed system of servers across the Internet for the purpose of rapid delivery of content.  The quick start guide on the leaflet site uses the Cloudfare CDN to serve leaflet. The pv-viability-map uses MapQuest's CDN as a tile server.  For my first leaflet map, I used both of these together.

      This is JavaScript that (using leaflet) does the work of rendering the map:
      var map = L.map('map').setView([38.8605579, -77.1166921], 15);

      L.tileLayer('http://otile{s}.mqcdn.com/tiles/1.0.0/map/{z}/{x}/{y}.jpg', {
          attribution: 'Portions Courtesy NASA/JPL-Caltech and U.S. Depart. of Agriculture, Farm Service Agency. Tiles Courtesy of <a href="http://www.mapquest.com/" target="_blank">MapQuest</a> <img src="http://developer.mapquest.com/content/osm/mq_logo.png">',
          maxZoom: 18,
          subdomains: '1234'
      }).addTo(map);
      The tileLayer method does the job retrieving and rendering the tiles selected by the setView method on the Map object.  The string substitution variables s, x, y, and z contain:
      s
      Sequence of available subdomains for the CDN. Set to '1234' in this case.
      x
      The longitude.
      y
      The latitude.
      z
      The zoom level.
      In this source listing I changed what had been 'sat' in the url to 'map' (colored green in the source listing for identification), which changed the rendered map to:
       I experimented with the zoom level and maxZoom settings.  Changing the zoom level to 18 and setting maxZoom to 19, the map looked like this:
      and allowed the + button to be clicked once, after which it became grayed out.  The highest usable zoom level seems to be 19 anyway, since when I tried 20 the map became solid gray. A zoom level of 1 shows the map of the entire planet.

      Saturday, July 11, 2015

      Photo Voltiac Viability Map II

      In a previous post I described installing the Photovoltaic Viability Map server software. I got the point where the 'make run' script was failing on connecting to the database.  In this post I'll describe how to get the database setup.

      I have installed PostGIS on the Ubuntu 14.04 server using:

      $ sudo aptitude install postgresql-9.3-postgis-2.1

      There is an init.sql file included with the web app to setup the database:


      When I run it with:
      $ sudo su postgres
      $ psql -d postgres -a -f init.sql
      I get an error:
      psql:init.sql:17: ERROR:  type "geometry" does not exist
      A post on stack overflow told me I needed to run:
      $ psql -d postgres -c "CREATE EXTENSION postgis;"
      After running this, init.sql ran without error, but 'make run' has a new problem:
      $ make run
      python3 httpserver.py
      Traceback (most recent call last):
        File "httpserver.py", line 17, in <module>
          host=app.config["DBHOST"]
        File "/usr/lib/python3/dist-packages/psycopg2/__init__.py", line 179, in connect
          connection_factory=connection_factory, async=async)
      psycopg2.OperationalError: FATAL:  database "test" does not exist

      make: *** [run] Error 1
      I ran:
      $ egrep test *
      and found:
      flaskconfig.py:DBNAME = 'test'
      After changing 'test' to 'postgres', I have a running server:
      $ make run
      python3 httpserver.py
      [15-07-11 11:57:54][NOTE] Starting server
       * Running on http://0.0.0.0:5000/
       * Restarting with reloader
      [15-07-11 11:57:54][NOTE] Starting server
      Connecting to it from the browser on my desktop machine, I see:
      My next task will be to populate the database with data.

      Thursday, July 9, 2015

      Admining a PostGIS Server

      In a previous post I documented setting up a VirtualBox VM running Ubuntu 14.04 as a PostGIS server. In this post I'll investigate administering the server, including creating databases and database users. Much of the on-line documentation for PostgreSQL is geared toward running it on Windows, or else spends a lot of unnecessary time from my point of view covering all three platforms (Windows, Mac, and Linux).  I'm using an Ubuntu server, so I want documentation for that. Here are a few resources that look promising:
      Of these the first one looks most promising, so I'll start with that. From it, I learn that:
      • Configuration files are located at: /etc/postgresql/9.3/main
      • Main config file is: postgresql.conf
      • Inside this file:
        • data_directory directive specifies where the databases are stored (on my machine it is set to /var/lib/postgresql/9.3/main).
        • hba_file directive specifies the host-based authentication file (on my machnie set to /etc/postgresql/9.3/main/pg_hba.conf).
        • ident_file directive specifies the ident authentication file (on my machine set to /etc/postgresql/9.3/main/pg_ident.conf).
        • The default port is set to 5432, and changing this requires restarting the server.
        • listen_addresses defaults to localhost.  I changed it to:
          listen_addresses = '*'
          so the server would accept connections from other machines (my desktop machine in this case).
      • The following commands control the running server:
        • $ sudo service postgresql stop
        • $ sudo service postgresql start
        • $ sudo service postgresql restart
        • $ sudo service postgresql reload
      • After changing the listen_address value, I did:
        $ sudo service postgresql restart
        * Restarting PostgreSQL 9.3 database server   [ OK ]
        $
      • Note: In Ubuntu, the server is run as a service called postgresql (configured in /etc/init.d/postgresql).
      Now let me see if I can connect to the database server, first locally and then remotely. Logged into the server via ssh, I did:
      $ sudo -u postgres psql
      psql (9.3.9)
      Type "help" for help.

      postgres=# help
      You are using psql, the command-line interface to PostgreSQL.
      Type:  \copyright for distribution terms
             \h for help with SQL commands
             \? for help with psql commands
             \g or terminate with semicolon to execute query
             \q to quit
      postgres=# \q
      $
      The YouTube video I listed above suggests a slightly different approach:
      $ sudo su postgres
      $ psql -U postgres -d postgres
      psql (9.3.9)
      Type "help" for help.

      postgres=#
      The -U argument to psql is the user and the -d argument is the database (both postgres at this point).  To be able to connect remotely, the postgres user is going to need a password:
      postgres=# \password postgres
      Enter new password:
      Enter it again:
      postgres=#
      Now let me see if I can connect to the server remotely.  From a terminal on my client machine:
      $ psql -h 10.0.0.12 -p 5432 -U postgres -d postgres
      psql: FATAL:  no pg_hba.conf entry for host "10.0.0.5", user "postgres", database "postgres", SSL on
      FATAL:  no pg_hba.conf entry for host "10.0.0.5", user "postgres", database "postgres", SSL off
      $
      A bit of googling led me to a StackExchange post with a solution to this problem. Back on the server again, I did:
      $ sudo vi /etc/postgresql/9.3/main/pg_hba.conf
      and changed this line:
      host  all  all  127.0.0.1/32  md5
      to:
      host  all  all  0.0.0.0/0     md5
      and finally:
      $ sudo service postgresql restart
       * Restarting PostgreSQL 9.3 database server    [ OK ]

      $
      Time to try again from the client machine:
      $ psql -h 10.0.0.12 -p 5432 -U postgres -d postgres
      Password for user postgres:
      psql (9.4.4, server 9.3.9)
      SSL connection (protocol: TLSv1.2, cipher: DHE-RSA-AES256-GCM-SHA384, bits: 256, compression: off)
      Type "help" for help.

      postgres=#
      Success (and it appears to confirm that there is no problem mixing a 9.3 server with a 9.4 client)!  I can now connect to the database server remotely, and I'm ready to start doing things with the database.

      I'm also going to setup PostgreSQL's GUI management tool on my client machine, just in case that will make managing the server easier.

      Setting Up pgAdmin on the Client Machine

      There is a GUI administration application for PostgreSQL called pgAdmin. To install it on my client machine (my desktop), I:
      $ sudo aptitude install pgadmin3
      [sudo] password for [username]:
      The following NEW packages will be installed:
        libpq5{a} libwxbase3.0-0{a} libwxgtk3.0-0{a} pgadmin3 pgadmin3-data{a}
        pgagent{a} postgresql-client{a} postgresql-client-9.4{a}
        postgresql-client-common{a}
      0 packages upgraded, 9 newly installed, 0 to remove and 2 not upgraded.
      Need to get 11.3 MB of archives. After unpacking 47.1 MB will be used.
      Do you want to continue? [Y/n/?] Y
      Since my client machine is running Ubuntu 15.04, it installed the postgresql-client-9.4 package while the server is running version 9.3 of the server.  Hopefully there won't be a problem for the newer client to connect to the slightly older server.

      After which I could launch the application from the Ubuntu dash, and see this window:

      Figuring I could now connect to the server, I clicked the icon that looks like a power plug and:
      Clicking the OK button showed that it worked:
      Progress!

      Wednesday, July 8, 2015

      PostGIS Installation

      PostGIS is free software that adds support for geographic objects to PostgreSQL. I am going to need a PostGIS database for the Photovoltaic Viability Map server, so today I'll start learning PostgreSQL server administration.

      My first step, as I've been doing repeatedly for the wide range of technologies I'm learning this Summer, is to setup a VirtualBox VM.  I've already documented that process in a previous post, so here I'll only note that I added PostgreSQL database in the Software selection screen during installation:
       Once I connected to the new VM from a terminal window using ssh, I checked to see what debian packages are in the standard Ubuntu repositories for PostGIS:
      $ apt-cache search postgis
      imposm - importer for OpenStreetMap data
      liblwgeom-2.1.2 - PostGIS "Lightweight Geometry" library
      liblwgeom-dev - PostGIS "Lightweight Geometry" library - Development files
      libpostgis-java - Geographic objects support for PostgreSQL -- JDBC support
      mapnik-vector-tile - Vector tiles integration with mapnik - development files
      osm2pgsql - OpenStreetMap data to PostgreSQL converter
      postgis - Geographic objects support for PostgreSQL
      postgis-doc - Geographic objects support for PostgreSQL -- documentation
      postgresql-9.3-postgis-2.1 - Geographic objects support for PostgreSQL 9.3
      postgresql-9.3-postgis-2.1-scripts - PostGIS for PostgreSQL 9.3 -- scripts -- dummy package
      postgresql-9.3-postgis-scripts - Geographic objects support for PostgreSQL 9.3 -- scripts
      python-imposm - importer for OpenStreetMap data - Python module
      qgis - Geographic Information System (GIS)
      $
      I looks like there is a package, postgis, that might have what I need.  Let me see:
      $ apt-cache show postgis
      Package: postgis
      Priority: optional
      Section: universe/misc
      Installed-Size: 886
      Maintainer: Ubuntu Developers <ubuntu-devel-discuss@lists.ubuntu.com>
      Original-Maintainer: Debian GIS Project <pkg-grass-devel@lists.alioth.debian.org>
      Architecture: amd64
      Version: 2.1.2+dfsg-2ubuntu0.1
      Depends: libc6 (>= 2.14), libgdal1h (>= 1.9.0), libgeos-c1 (>= 3.4.2), libglib2.0-0 (>= 2.12.0), libgtk2.0-0 (>= 2.14.0), liblwgeom-2.1.2 (>= 2.0.0), libpq5
      Suggests: postgresql-9.3-postgis-2.1, postgis-doc
      Filename: pool/universe/p/postgis/postgis_2.1.2+dfsg-2ubuntu0.1_amd64.deb
      Size: 156234
      MD5sum: 0cb613a28ff7c0cc3534ed38d5e4a5ff
      SHA1: bd38017300d570834784c2810704d6d55a72f90c
      SHA256: c7d88af4872e96628b18e24ef5966203c7fa809e41f753c1f516f9cbc9c7c68f
      Description-en: Geographic objects support for PostgreSQL
       PostGIS adds support for geographic objects to the PostgreSQL
       object-relational database. In effect, PostGIS "spatially enables"
       the PostgreSQL server, allowing it to be used as a backend spatial
       database for geographic information systems (GIS), much like ESRI's
       SDE or Oracle's Spatial extension. PostGIS follows the OpenGIS
       "Simple Features Specification for SQL".
       .
       This package contains the PostGIS userland binaries, common files.
      Description-md5: 71b1ab6dbb24f361235106dc71acd572
      Homepage: http://postgis.refractions.net/
      Bugs: https://bugs.launchpad.net/ubuntu/+filebug
      Origin: Ubuntu
      Looks like what I need. I'll install it:
      $ sudo aptitude install postgis
      [sudo] password for [username]:
      The following NEW packages will be installed:
        fontconfig{a} fontconfig-config{a} fonts-dejavu-core{a}
        hicolor-icon-theme{a} libarmadillo4{a} libarpack2{a} libatk1.0-0{a}
        libatk1.0-data{a} libavahi-client3{a} libavahi-common-data{a}
        libavahi-common3{a} libblas3{a} libcairo2{a} libcups2{a} libdap11{a}
        libdapclient3{a} libdatrie1{a} libepsilon1{a} libfontconfig1{a}
        libfreexl1{a} libgdal1h{a} libgdk-pixbuf2.0-0{a}
        libgdk-pixbuf2.0-common{a} libgeos-3.4.2{a} libgeos-c1{a} libgfortran3{a}
        libgif4{a} libgraphite2-3{a} libgtk2.0-0{a} libgtk2.0-bin{a}
        libgtk2.0-common{a} libharfbuzz0b{a} libhdf4-0-alt{a} libhdf5-7{a}
        libjasper1{a} libjbig0{a} libjpeg-turbo8{a} libjpeg8{a} libkml0{a}
        liblapack3{a} liblcms2-2{a} libltdl7{a} liblwgeom-2.1.2{a}
        libmysqlclient18{a} libnetcdfc7{a} libodbc1{a} libogdi3.2{a}
        libpango-1.0-0{a} libpangocairo-1.0-0{a} libpangoft2-1.0-0{a}
        libpixman-1-0{a} libpoppler44{a} libproj0{a} libquadmath0{a}
        libspatialite5{a} libthai-data{a} libthai0{a} libtiff5{a}
        liburiparser1{a} libwebp5{a} libxcb-render0{a} libxcb-shm0{a}
        libxcomposite1{a} libxcursor1{a} libxdamage1{a} libxerces-c3.1{a}
        libxfixes3{a} libxi6{a} libxinerama1{a} libxrandr2{a} libxrender1{a}
        mysql-common{a} odbcinst{a} odbcinst1debian2{a} postgis proj-bin{a}
        proj-data{a}
      0 packages upgraded, 77 newly installed, 0 to remove and 0 not upgraded.
      Need to get 21.0 MB of archives. After unpacking 80.6 MB will be used.
      Do you want to continue? [Y/n/?] Y
      Lots of dependencies, many of which appear to be for rendering fonts and graphics, but the postgresql-9.3-postgis-2.1 is not among them.  I see in the package details for postgis that it recommends postgresql-9.3-postgis-2.1, so I'll install that as well:
      $ sudo aptitude install postgresql-9.3-postgis-2.1
      [sudo] password for [username]:
      The following NEW packages will be installed:
        postgresql-9.3-postgis-2.1 postgresql-9.3-postgis-scripts{a}
      0 packages upgraded, 2 newly installed, 0 to remove and 0 not upgraded.
      Need to get 729 kB of archives. After unpacking 15.6 MB will be used.
      Do you want to continue? [Y/n/?] Y
      I now have a PostGIS server successfully installed on a VirtualBox VM.  I'll document learning how to use it in a separate post.

      Notes from Chapter 1 of Manual of Airborne Topographic Lidar

      My Summer GIS independent study through George Mason University, GGS 698: Urban Mapping with LIDAR involves two parts:
      1. A theoretical part where I will independently complete the OER course materials from Penn State's GEOG 481: Topographic Mapping with Lidar course.
      2. A practical part where I will continue development of the Photovoltaic Viability Map.
      In a previous post I documented the first steps in setting up the Photovoltaic Viability Map web application. In this post I'll summarize the first chapter of  the Manual of Airborne Topographic Lidar -- part of the first reading assignment for the course.

      The book is published by the ASPRS, which is mentioned several times in the forward and chapter 1, without description of the organization of expansion of the acronym. A bit of googling revealed that it is the American Society for Photogrammetry and Remote Sensing, founded in 1934.

      Chapter 1: Introduction

      In chapter 1 editor Michael S. Renslow describes lidar (LIght Detection And Ranging) as a mature mapping technology that provides 3D information for the earth's surface including terrain surface models, vegetation characteristics, and man-made features.  Lidar is an active remote sensing technology that generates pulses of light and then detects their reflections, much like radar and sonar do with radio and sound waves respectively.

      Lidar is particularly useful for modern mapping and GIS integration due to its data being natively 3D and georeferenced.  The point cloud data generated by lidar systems can be processed for a wide variety of uses, including feature mapping, vegetation mapping, transportation mapping, transmission corridor mapping, 3D building models, natural hazard detection, and natural disaster evaluation.

      Lidar is quite accurate, Renslow states, with between 5 and 15 cm vertical accuracy, and it can be processed rapidly to produce imagery for spatial referencing. It is a fairly recent technology, being developed originally by the defense industry in the early 1990s, and it has improved rapidly since then from a repetition rate of 5,000 to 10,000 pulses per second in the early systems to between 150,000 and 400,000 pulses per second returning up to 10 to 12 points per square meter in current systems.

      Lidar technology progressed for over a decade without specific data standards, but standardization efforts now include the ASPRS LAS data standard for lidar data classification and the USGS's Base Lidar Specification for digital elevation model production.  Renslow concludes page 1 by mentioning two emerging lidar technologies that will be discussed in the book: FLASH Lidar and Gieger Mode Lidar.

      The remainder of the first chapter is a list of commonly used lidar terms.

      Commonly Used Lidar Terms

      Airborne Laser Scanning (ALS)
      a synonym for lidar, also referred to as laser altimetry. Comprised of a Direct Georeferencing System (often called a Position Orientation System, or POS) to accurately determing the position and orientation of the ALS platform, and the Laser Scanner System to emit and receive laser pulses.
      Along Track Resolution
      the spacing of pulses from the system in the platform's flight direction.
      Artifacts
      Detectable surface remnants of elevated features in a bare earth elevation model.
      Attitude (pitch, roll, and yaw)
      pitch: vertical rotation of the aircraft (nose up, nose down) roll: rotation around the flight vector (wing up, wing down) yaw: horizontal rotation (nose left, nose right)
      Avalanche Photodiode (APD)
      converts light signal to electronic voltage pulse.
      Backscatter
      electromagnetic energy reflected back toward its source by terrain or atmospheric particles.
      Base Station
      GPS or GNSS receiver at an accurately-known fixed location used to derive information for the onboard GNSS receiver. Base station receiver records raw GNSS data which are applied during processing of raw lidar data.
      Bare Earth
      digital elevation of the terrain free of vegetation, buildings, and other man-made structures.
      Beam Divergence
      increase in diameter of a beam with distance from the aperture. Typically measured in milliradians (mrad). Higher frequency beams generally have lower divergence.
      Boresight
      calibration of sensor system equipped with IMU to determine attitude of active sensor pulses.
      Canopy Height Model (CHM)
      representation of difference between top of canopy surface and underlying ground topography derived by filtering and classifying lidar point clouds to separate ground from canopy hits.
      Collimated
      light that does not disperse and thus has low beam divergence. Lidar laser beams are highly collimated. Collimated rays are described as parallel and focused at infinity.
      Cross Track Resolution
      spacing of pulses from lidar system in scanning direction (perpendicular to direction platform is moving).
      Direct Georeferencing
      direct measurement of position (x-y-z coordinates) and attitude (roll-pitch-yaw) of sensor to determine position and orientation.
      Echo
      each return from emitted laser pulse in a multiple-pulse-return laser scanning system (first, intermediate..., last).
      GLONASS
      Globalnaya navigasionnaya sputnikovaya sistema, a radio-based satellite navigation system operated by Russian Space Forces.
      GNSS
      Global Navigation Satellite System, a satellite navigation system with global coverage.
      Inertial Measurement Unit (IMU)
      monitors angular accelerations (using accelerometers) and rotations (using gyroscopes) of aircraft (and sensor) with respect to attitude. Integrating these measurements with time enables determining precise orientation of sensor platform over time. Typically recorded at 50 Hz to 200 Hz.
      Lever Arm Offsets
      perpendicular distance from axis of rotation to line of action of force. Measured precisely between ALS system components to enable integration of information from all system subcomponents during postprocessing.
      Near Infra-red (NIR)
      wavelenghts between 800 nm and 2500 nm. Majority of ALS sensors use NIR wavelengths of 1000nm, 1047nm, 1064nm, and 1550nm due to availability of stable lasing materials, reflectivity of natural surfaces, low signal-to-noise ration in sunlight, and eye-safe nature of these wavelengths.
      Nominal Point Spacing (NPS)
      important depending on specific application because lidar senors are random sampling systems. Lidar technology is based on random distribution of mass points that result in point cloud of data. Flight planning process can design project to estimate NPS and density of resulting data set.
      Point Cloud
      cluster of points that comprise lidar data achieved from reflections of laser beams off various landscape features, thus representing feature height and 3D relationship between features.
      Point Dropout
      laser pulses for which no energy was returned to the sensor. Can occur if aircraft (sensor) is too high, surface material is absorbing, or ground level energy is reflected away from sensor.
      Positioning Orientation System (POS)
      accurately determines position and orientation of ALS platform in 3D space at time of pulse emission and reception. Comprised of Differential GPS System (DGPS) to determine geographic position of platform within 5 cm of true trajectory, and IMU to measure orientation changes through time.
      Point Spacing
      average ground distance between successive pulse returns.
      Pulse Footprint
      area of ground intersected by laser pulse. It is a function of range, angle of incidence, and beam divergence.
      Pulse Footprint Smearing
      elongation of pulse footprint caused when laser beam is reflected from sloped terrain (especially away from center of scan) causing increaded uncertainty of horizontal and vertical position.
      Pulse Repetition Frequency (PRF)
      frequency of transmitted laser pulses (i.e. points per second). High PRF enables dense point-spacing providing high-resolution representations of landscape.
      Pulse Return
      laser pulses reflected off surfaces below the sensor and received by the lidar sensor. First pulse returns measure range to first surface encountered (i.e. vegetation, canopy, building roofs); last pulse returns measure to last surface encountered (i.e. ground).
      Pulse Return Intensity
      reflective NIR intensity of pulse returns can be measured by most ALS systems and provide improved discrimination and classification of scanned features. Intensity data is a function of pulse range, pulse footprint size, angle of incidence at point of return, and spectral characteristics of encountered surface.
      Range
      distance between laser aperture and detected object or surface.
      Repetition Rate
      pulses-per-second of laser denoted in KHz. A 200KHz system indicates lidar system will pulse 200,000 times per second, which means the receiver can (but usually does not) receive information from each of these 200,000 pulses.
      Scan Angle
      half the angle of full sweep of a scanning mirror scanner. Large scan angles are generally not chosen at high altitudes due to high dropout rates, increased error, and obstruction shadowing at edges of scan. Typically do not exceed 30 degrees.
      Scan Rate
      frequency of cross-track sweeps of a mirror scanner in Hz.
      Swath Width
      width of survey area covered by complete sweep of scanner. Related to flying height and scanner angle.
      Time Interval Meter (TIM)
      method used to time-stamp the pulse transmission and reception points to determine time difference between pulse transmission and reception and the resulting range and position of reflective surface.

      REFERENCE

      Renslow, Michael S. Manual of Airborne Topographic Lidar. Bethesda, MD.: American Society for Photogrammetry Remote Sensing, 2012. Print.

      Tuesday, July 7, 2015

      FXOS, Node.js, and Friendzy

      I'm working with three high school interns this Summer to continue the Firefox OS app development project began by Alex, Aki, and Finn during the last school year.  Yesterday I suggested that they continue work on the Friendzy app that Finn started.

      Friendzy is a small client-server app that uses Firefox OS on the client side and Node.js on the server side to allow users to find the location of a group of friends who are using the app together. It has the potential to be fun and engaging for students while providing easy to follow examples of several important technologies.

      I've never done anything with node before beyond installing it and running the first example or two in on-line documentation I found.  Since I'm charging Eric, Liam, and Ryan, the three Summer interns, with understanding and then improving Friendzy, I figure I better have a go at it before they do.

      The first thing I needed to do was to remove the references Finn had in his code to a specific server we had been using in class, and to replace those references with "localhost".  I added a crude icon, and emailed a friend to ask her if she could make a better one.  Then I deleted my github fork of Finn's version and the revision information in my local copy (by removing the .git directory). Then I created a new repository for Friendzy on github and committed my changed version to a new local repository, and pushed this up to github.

      Next I created a VirtualBox VM with Ubuntu 15.04 server edition on which to run the Friendzy server.  I've been making these virtual machines a lot lately, since it allows me to experiment freely with server configuration without fear of messing up my host machine.

      (note: my first experiment using the node.js apt packages from the standard Ubuntu repository failed.  npm is not included in the node.js package, and when I installed it separately and used it to install missing node packages, nodejs still couldn't find them.  Rather than try to debug that situation, I decided to try the more recent version of node.js (0.12), which does include npm in the package.  When I did that, it worked).

      Now let me see if I can get Friendzy running.  On my fresh server I:
      •  $ curl -sL https://deb.nodesource.com/setup_0.12 | sudo -E bash -
      •  $ sudo aptitude install nodejs
        git comes preinstalled on Ubuntu 15.04 server, so I didn't need to install that. I did need to create an ssh public key and add it to github before I could clone Friendzy.  I already documented that process in a previous post.
        • $ git clone git@github.com:jelkner/Friendzy.git
        • $ cd Friendzy/node
        • $ nodejs server.js

          module.js:340
              throw err;
                    ^
          Error: Cannot find module 'express'
              at Function.Module._resolveFilename (module.js:338:15)
              at Function.Module._load (module.js:280:25)
              at Module.require (module.js:364:17)
              at require (module.js:380:17)
              at Object.<anonymous> (/home/[username]/Friendzy/node/server.js:1:81)
              at Module._compile (module.js:456:26)
              at Object.Module._extensions..js (module.js:474:10)
              at Module.load (module.js:356:32)
              at Function.Module._load (module.js:312:12)
              at Function.Module.runMain (module.js:497:10)
        •  $ npm install express
          express@4.13.1 node_modules/express
          ├── escape-html@1.0.2
          ├── merge-descriptors@1.0.0
          ├── array-flatten@1.1.0
          ├── cookie@0.1.3
          ├── utils-merge@1.0.0
          ├── cookie-signature@1.0.6
          ├── methods@1.1.1
          ├── fresh@0.3.0
          ├── range-parser@1.0.2
          ├── path-to-regexp@0.1.6
          ├── content-type@1.0.1
          ├── etag@1.7.0
          ├── vary@1.0.0
          ├── parseurl@1.3.0
          ├── content-disposition@0.5.0
          ├── serve-static@1.10.0
          ├── depd@1.0.1
          ├── qs@4.0.0
          ├── finalhandler@0.4.0 (unpipe@1.0.0)
          ├── on-finished@2.3.0 (ee-first@1.1.1)
          ├── debug@2.2.0 (ms@0.7.1)
          ├── proxy-addr@1.0.8 (forwarded@0.1.0, ipaddr.js@1.0.1)
          ├── type-is@1.6.4 (media-typer@0.3.0, mime-types@2.1.2)
          ├── accepts@1.2.10 (negotiator@0.5.3, mime-types@2.1.2)
          └── send@0.13.0 (destroy@1.0.3, statuses@1.2.1, ms@0.7.1, mime@1.3.4, http-errors@1.3.1)
        • $ nodejs server.js
          module.js:338
              throw err;
                    ^
          Error: Cannot find module 'socket.io'
              at Function.Module._resolveFilename (module.js:336:15)
              at Function.Module._load (module.js:278:25)
              at Module.require (module.js:365:17)
              at require (module.js:384:17)
              at Object.<anonymous> (/home/[username]/Friendzy/node/server.js:3:10)
              at Module._compile (module.js:460:26)
              at Object.Module._extensions..js (module.js:478:10)
              at Module.load (module.js:355:32)
              at Function.Module._load (module.js:310:12)
              at Function.Module.runMain (module.js:501:10)
        • npm install socket.io

          > ws@0.5.0 install /home/jelkner/Friendzy/node/node_modules/socket.io/node_modules/engine.io/node_modules/ws
          > (node-gyp rebuild 2> builderror.log) || (exit 0)

          |
          > ws@0.4.31 install /home/jelkner/Friendzy/node/node_modules/socket.io/node_modules/socket.io-client/node_modules/engine.io-client/node_modules/ws
          > (node-gyp rebuild 2> builderror.log) || (exit 0)

          socket.io@1.3.5 node_modules/socket.io
          ├── debug@2.1.0 (ms@0.6.2)
          ├── has-binary-data@0.1.3 (isarray@0.0.1)
          ├── socket.io-adapter@0.3.1 (object-keys@1.0.1, debug@1.0.2, socket.io-parser@2.2.2)
          ├── socket.io-parser@2.2.4 (isarray@0.0.1, debug@0.7.4, component-emitter@1.1.2, benchmark@1.0.0, json3@3.2.6)
          ├── engine.io@1.5.1 (base64id@0.1.0, debug@1.0.3, engine.io-parser@1.2.1, ws@0.5.0)
          └── socket.io-client@1.3.5 (to-array@0.1.3, indexof@0.0.1, object-component@0.0.3, component-bind@1.0.0, debug@0.7.4, backo2@1.0.2, component-emitter@1.1.2, has-binary@0.1.6, parseuri@0.0.2, engine.io-client@1.5.1)
        • $ nodejs server.js
          module.js:338
              throw err;
                    ^
          Error: Cannot find module 'sqlite3'
              at Function.Module._resolveFilename (module.js:336:15)
              at Function.Module._load (module.js:278:25)
              at Module.require (module.js:365:17)
              at require (module.js:384:17)
              at Object.<anonymous> (/home/[username]/Friendzy/node/server.js:5:15)
              at Module._compile (module.js:460:26)
              at Object.Module._extensions..js (module.js:478:10)
              at Module.load (module.js:355:32)
              at Function.Module._load (module.js:310:12)
              at Function.Module.runMain (module.js:501:10)
        • $ npm install sqlite3
          -
          > sqlite3@3.0.8 install /home/[username]/Friendzy/node/node_modules/sqlite3
          > node-pre-gyp install --fallback-to-build

          [sqlite3] Success: "/home/[username]/Friendzy/node/node_modules/sqlite3/lib/binding/node-v14-linux-x64/node_sqlite3.node" is installed via remote
          sqlite3@3.0.8 node_modules/sqlite3
          └── nan@1.8.4
        • $ nodejs server.js
          [LocateFriends] Listening on *:3000
        • ^C
        Next time I'll just do:
        • $ npm install express socket.io sqlite3
        in the beginning and be done with it.  In any case, I have a running Friendzy server on the virtual machine.  My VM has IP address 10.0.0.10.

        To get the client to connect to the server, I needed to change localhost to 10.0.0.10 in two files:
        1. js/app.js
        2. js/usersetup.js
        In both cases the change is near the top of the source file, immediately after:

               IP = "...

        I was able to connect to the server from the Friendzy client running in an emulator, as seen here:
        The terminal window is my ssh session with the VM running the server on 10.0.0.10:3000. The WebIDE connected to a Firefox OS 2.0 emulator running the client appear in two other windows, and the last window is Firefox running on the desktop pointed at 10.0.0.10:3000 to see what would happen.

        Now let's see what Eric, Liam, and Ryan can do with this!

        Monday, July 6, 2015

        Photo Voltiac Viability Map I

        This is a follow up to my previous post titled Getting Started with LIDAR Data written on the 6th of May.

        I'll be building on the project that Sam Phillips completed during his 3 week internship.  My first task is to get Sam's application running on my machine.  I setup a VirtualBox VM for that purpose, using the same approach as I did to install django CMS on another VM.  I've already made my own fork of Sam's project.

        Starting with a fresh VM running Ubuntu 14.04 server, I logged into it from my terminal using ssh
        and did the following:
        • $ sudo aptitude install git
        • $ git clone git@github.com:jelkner/pv-viability-map.git
        I got a:
        Permission denied (publickey).
        fatal: Could not read from remote repository.

        Please make sure you have the correct access rights
        and the repository exists.
        since I didn't have an ssh public key on github for the new VM. To fix that, I did:
        • $ ssh-keygen
        • $ cd .ssh
        • Navigated to my profile on github and clicked the "Edit" button.
        • Clicked on the "SSH Keys" link.
        • Clicked the "Add SSH Key" button.
        • Opened the id_rsa.pub file in the .ssh directory in a text editor.
        • Copied and pasted the contents of this file to the "key" field on the github form (after giving it an appropriate title).
        After doing this was able to rerun the git clone command and it downloaded the pv-viability-map source to my VM.

        Sam did a terrific job documenting his work.  His README.md tells the user where to start, and his documention.txt file contains detailed information about how his application works.  That plus the source code is all I should need to get started.

        Since I have neither make nor flask installed, I'll add those along with PostgreSQL:
        • $ sudo aptitude install make python3-flask postgresql postgis
        I'm going to need to spend some time learning PostgreSQL before I can continue too much further with this project, but before I stop to do that I'll try to start the server and see if I can find other missing dependencies.
        • $ make run
          coffee -c sunlight.coffee
          make: coffee: Command not found
          make: *** [sunlight.js] Error 127
         OK, I need CoffeeScript.
        • $ sudo aptitude install coffeescript
        •  $ make run
          coffee -c sunlight.coffee
          python3 httpserver.py
          Traceback (most recent call last):
            File "httpserver.py", line 3, in <module>
              import api
            File "/home/[username]/pv-viability-map/api.py", line 1, in <module>
              import geojson
          ImportError: No module named 'geojson'
          make: *** [run] Error 1
        geojson is a python module that doesn't have an ubuntu package available for it, so I'll need to use pip for that.  I can also see from the import section of api.py that I'm going to need shapely. There is an ubuntu package for that. I'll keep running make run and installing missing dependencies until I get a failure to connect to the database.  I'll also install a few of the libraries I needed for django CMS just for good measure.
        • $ sudo aptitude install python3-pip python3-shapely
        • $ sudo pip3 install geojson
        • $ sudo aptitude install python3-all-dev libtiff5-dev libjpeg8-dev
        • $ sudo aptitude install libwebp-dev tcl8.6-dev tk8.6-dev
        • $ make run
          python3 httpserver.py
          Traceback (most recent call last):
            File "httpserver.py", line 4, in <module>
              import psycopg2
          ImportError: No module named 'psycopg2'
          make: *** [run] Error 1
        • $ sudo aptitude install python3-psycopg2
        • $ make run
          python3 httpserver.py
          Traceback (most recent call last):
            File "httpserver.py", line 6, in <module>
              import import_tool
            File "/home/jelkner/pv-viability-map/import_tool.py", line 8, in <module>
              import shapefile
          ImportError: No module named 'shapefile'
          make: *** [run] Error 1
        • $ sudo aptitude install python3-pyshp
        • $ make run
          python3 httpserver.py
          Traceback (most recent call last):
            File "httpserver.py", line 6, in <module>
              import import_tool
            File "/home/jelkner/pv-viability-map/import_tool.py", line 10, in <module>
              import pyproj
          ImportError: No module named 'pyproj'
          make: *** [run] Error 1
        • $ sudo aptitude install python3-pyproj
        • $ make run
          python3 httpserver.py
          Traceback (most recent call last):
            File "httpserver.py", line 6, in <module>
              import import_tool
            File "/home/jelkner/pv-viability-map/import_tool.py", line 11, in <module>
              from osgeo import osr
          ImportError: No module named 'osgeo'
          make: *** [run] Error 1
        • $ sudo aptitude install python3-gdal
        • $ make run
          python3 httpserver.py
          Traceback (most recent call last):
            File "httpserver.py", line 17, in <module>
              host=app.config["DBHOST"]
            File "/usr/lib/python3/dist-packages/psycopg2/__init__.py", line 179, in connect
              connection_factory=connection_factory, async=async)
          psycopg2.OperationalError: FATAL:  password authentication failed for user "sunlight"
          FATAL:  password authentication failed for user "sunlight"

          make: *** [run] Error 1
        A rather tedious way to find all the dependencies, but I finally failed on a database error, so it's time to stop for now until I spend some time learning PostgreSQL.

        I have to remember to clean this up later into a much more compact set of installation instructions. I'll also take the opportunity now to make a copy of my virtual hard drive, so I've got a snapshot of it in its present state.


        Before ending this post, I want to note something about the data source we are using for the LIDAR data. The USGS has a website called EarthExplorer that  has the Loudoun County Virginia LIDAR data set in one large (76.7 megabytes) file. This is not ideal to use for experimentation and learning, since scripts which run on it will take a long time to run (we are using Loudoun County instead of Arlington County data because the Arlington County LIDAR data is not available yet).

        A website called Virginia Lidar has the same data available in much smaller LAZ files, so I'll start with the data here.

        Saturday, July 4, 2015

        Updating the Firmware on my Pyboard


        Before I begin the post proper, an aside...

        Larry Cuban just made a wonderful blog post titled Fixing Schools Again, and Again in which he says,
        "If amnesia were like aphrodisiac pills, policymakers have been popping capsules for years. Memory loss about past school reforms permits policymakers to forge ahead with a new brace of reforms and feel good."
        To an educator of 24 years these words ring so true!  Time and time again I've watched my own school system move from one initiative to another, never stopping for a moment to look back at where we've been so that we might learn something from our journey.


        In this intensive Summer of learning, I've been trying to juggle several learning goals, each associated with either NOVA Web Development or the future IT curriculum at Arlington Tech (or hopefully, both):
        1. GIS, specially web GIS mapping of LIDAR data
        2. Firefox OS App development
        3. Django and django CMS
        4. MicroPython programming on the pyboard
        This post will document the process of updating the firmware on the pyboard.

        I'll be using the Pyboard Firmware Update guide my dear friend and co-conspirator Kevin Cole mentioned in a blog post, along with the instructions Kevin documented in the same post.

        The first step in the process is to connect my pyboard physically to my to my desktop workstation by USB cable and verify that I can interact with it. When I connected the cable, a filesystem named PYBFLASH auto-mounted, showing these contents:
        Kevin says to run screen, when I checked, I didn't have screen installed, so I ran:
        $ sudo aptitude install screen dfu-util
          When I tried to connect to the pyboard using screen, it failed:
          $ screen /dev/ttyACM0
          [screen is terminating]
          $
          
          So I checked to see if the device was there:.
          $ ls -l /dev/ttyACM*
          crw-rw---- 1 root dialout 166, 0 Jul 4 15:39 /dev/ttyACM0
          $
          Ahh, I bet I'm not in the dialout group.
          $ groups [username]
          [username] : [username] adm cdrom sudo dip plugdev lpadmin sambashare
          $ sudo adduser [username] dialout
          [sudo] password for [username]:
          Adding user `[username]' to group `dialout' ...
          Adding user [username] to group dialout
          Done.
          $ groups [username]
          [username] : [username] adm dialout cdrom sudo dip plugdev lpadmin sambashare
          That's better.  I still needed to restart my machine before I could connect, but after that screen /dev/ttyACM0 gave me a blank screen, and after I hit <Enter> I saw:
          Traceback (most recent call last):
            File "", line 1
          SyntaxError: invalid syntax
          >>> 
          
          I'm in! Now let me move on upgrading the firmware.  Typing ^D (that's Ctrl+D) at the python prompt gave me:
          PYB: sync filesystems
          PYB: soft reboot
          Micro Python v1.3.10 on 2015-02-13; PYBv1.0 with STM32F405RG
          Type "help()" for more information.
          >>>
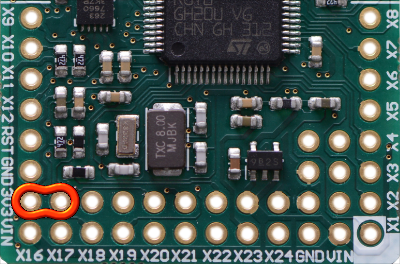
          Kevin's next instruction says, "Next, disconnect the USB cable, jumper the BOOT0 and 3V3 pins, and reconnect the USB cable".  There is a picture of this on the Pyboard Firmware Update guide:
          The problem is that I'm at my grandmother's house in a rural part of South Jersey without a car. Just how am I going to "jumper"?  Kevin and I asked our friend Paul Flint in Vermont, who has a knack for solving these sorts of problems.  He suggested a paper clip.  Why didn't I think of that?
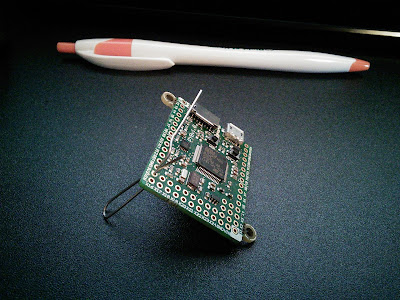
          My pyboard with paper clip jumper
          I downloaded the latest micropython image (pybv10-2015-07-04-v1.4.4-65-gb19d273.dfu at the time of this writing) and reconnected by pyboard by USB.
          $ lsusb
          Bus 003 Device 002: ID 8087:8001 Intel Corp.
          Bus 003 Device 001: ID 1d6b:0002 Linux Foundation 2.0 root hub
          Bus 002 Device 001: ID 1d6b:0003 Linux Foundation 3.0 root hub
          Bus 001 Device 003: ID 8087:0a2a Intel Corp.
          Bus 001 Device 009: ID 0424:2228 Standard Microsystems Corp. 9-in-2 Card Reader
          Bus 001 Device 008: ID 0424:2602 Standard Microsystems Corp. USB 2.0 Hub
          Bus 001 Device 007: ID 0424:2514 Standard Microsystems Corp. USB 2.0 Hub
          Bus 001 Device 006: ID 413c:3016 Dell Computer Corp. Optical 5-Button Wheel Mouse
          Bus 001 Device 005: ID 046d:0825 Logitech, Inc. Webcam C270
          Bus 001 Device 004: ID 413c:2003 Dell Computer Corp. Keyboard
          Bus 001 Device 002: ID 050d:0234 Belkin Components F5U234 USB 2.0 4-Port Hub
          Bus 001 Device 012: ID 0483:df11 STMicroelectronics STM Device in DFU Mode
          Bus 001 Device 001: ID 1d6b:0002 Linux Foundation 2.0 root hub
          I've highlighted in green the line we are interested in.
          $ sudo dfu-util -l
          [sudo] password for [username]:
          dfu-util 0.8

          Copyright 2005-2009 Weston Schmidt, Harald Welte and OpenMoko Inc.
          Copyright 2010-2014 Tormod Volden and Stefan Schmidt
          This program is Free Software and has ABSOLUTELY NO WARRANTY
          Please report bugs to dfu-util@lists.gnumonks.org

          Found DFU: [0483:df11] ver=2200, devnum=12, cfg=1, intf=0, alt=3, name="@Device Feature/0xFFFF0000/01*004 e", serial="346135523333"
          Found DFU: [0483:df11] ver=2200, devnum=12, cfg=1, intf=0, alt=2, name="@OTP Memory /0x1FFF7800/01*512 e,01*016 e", serial="346135523333"
          Found DFU: [0483:df11] ver=2200, devnum=12, cfg=1, intf=0, alt=1, name="@Option Bytes  /0x1FFFC000/01*016 e", serial="346135523333"
          Found DFU: [0483:df11] ver=2200, devnum=12, cfg=1, intf=0, alt=0, name="@Internal Flash  /0x08000000/04*016Kg,01*064Kg,07*128Kg", serial="346135523333"
          Again, I highlighted in green the line we are looking for, the internal flash.
          $ sudo dfu-util --alt 0 -D pybv10-2015-07-04-v1.4.4-65-gb19d273.dfu 
          dfu-util 0.8
          
          Copyright 2005-2009 Weston Schmidt, Harald Welte and OpenMoko Inc.
          Copyright 2010-2014 Tormod Volden and Stefan Schmidt
          This program is Free Software and has ABSOLUTELY NO WARRANTY
          Please report bugs to dfu-util@lists.gnumonks.org
          
          Match vendor ID from file: 0483
          Match product ID from file: df11
          Opening DFU capable USB device...
          ID 0483:df11
          Run-time device DFU version 011a
          Claiming USB DFU Interface...
          Setting Alternate Setting #0 ...
          Determining device status: state = dfuERROR, status = 10
          dfuERROR, clearing status
          Determining device status: state = dfuIDLE, status = 0
          dfuIDLE, continuing
          DFU mode device DFU version 011a
          Device returned transfer size 2048
          DfuSe interface name: "Internal Flash  "
          file contains 1 DFU images
          parsing DFU image 1
          image for alternate setting 0, (2 elements, total size = 273128)
          parsing element 1, address = 0x08000000, size = 13580
          Download [=========================] 100%        13580 bytes
          Download done.
          parsing element 2, address = 0x08020000, size = 259532
          Download [=========================] 100%       259532 bytes
          Download done.
          done parsing DfuSe file
          $ 
          
          After disconnecting the pyboard, removing the jumper (paper clip), and reconnecting the pyboard and starting a screen session to it, and typing ^D, I was rewarded for my efforts when I saw:
          PYB: sync filesystems
          PYB: soft reboot
          Micro Python v1.4.4-65-gb19d273 on 2015-07-04; PYBv1.0 with STM32F405RG
          Type "help()" for more information.
          >>> 
          
          Now let's see what Kevin and the MicroPython interns can do with our newly flashed pyboards...