Thursday, January 26, 2017

Migrating from VirtualBox to KVM/Qemu

I've been using VirtualBox for years on my Ubuntu systems to test and use other operating systems on the host machine.  Since I am working with five of my students this year to help them prepare for the RHCSA exam, I've been learning to use KVM for virtualization instead. KVM with virt-manager has proven to be easier to use than VirtualBox, since I don't have to install any add-on video drivers to get screen resolutions changed, and it seems to run faster and with less resource overhead than VirtualBox.

First thing I did was install:
$ sudo apt install qemu-kvm libvirt-bin bridge-utils
$ sudo ap install virt-manager
Then I added myself to the libvirtd group, so that I would have access:
$ sudo adduser [user] libvirtd
I converted my VirtualBox hard drive images to KVM images with:
$ qemu-img convert -f vdi oldImage.vdi -O qcow2 newImage.qcow
Here is a screenshot of Debian Jessie running on Ubuntu Yakety:


Resources

Saturday, January 14, 2017

Welcome to PIXEL!

A little over a week ago an old friend from the OLPC Learning Club DC, Kim Toufectis, dropped by our Thursday night Code for NOVA meetup and we took to chatting about what's going on in the world of the free software education community. A group of us at the Code for NOVA meetup have been exploring the Raspberry Pi. While admittedly a bit far removed from Code for America's civic hacking mission, the Raspberry Pi and the growing community around it are providing wonderful educational resources for learning to program in Python, and learning to use and manage GNU/Linux computer systems, both of which will be extremely useful for folks coming to our meetup wanting to acquire the skills they need to contribute to civic hacking projects.

From Raspbian to Debian + PIXEL

What Kim told me about that excited me the most was the recently released i386 port of the desktop used on the Raspberry Pi. I've been following the Raspberry Pi since I came home from Pycon 2013 with 4 of them. What makes this new port a potential game changer is that it would allow me to run the same desktop on both the computers in my classroom and on the Raspberry Pi's. This means that the Pi's amazing collection of educational resources could be used without change on my lab computers.

At present, i386 Debian + PIXEL is only available as a live image that boots from either DVD or USB.  I want to be able to install it on the hard drive of lab machines, and indeed I have an old Dell laptop that won't boot from USB which has only a CDROM drive, so neither of the available options would work on this machine. I also want to be able to run it in virtual machines using KVM on my Ubuntu hosts. With the help of two resourceful students, I developed the following first draft of a process by which to do this.

Installing the Debian + PIXEL Desktop on a KVM Virtual Machine


1. Start with a base Debian 8 (Jessie) i386 install

I used a netinstall iso image, which is both really small and which provides maximum flexibility, as long as you have an available network connection on the machine on which you are installing.


Since I don't know yet which of the general option offered by the installer provide which specific software, I decided to deselect everything and use the minimal installation offered.  I allocated 1 Gig of RAM, 1 processor, and 20 Gigs of virtual hard drive space to this machine.

2. Login to the completed virtual machine as root and run the following commands:
# apt install ssh sudo vim
# add user [username] sudo
# ifconfig
I got the IP address of the virtual machine from ifconfig, I used ssh to connect to it from a GNOME Terminal on the host machine, so that I could easily copy and paste the rest of the commands I wanted to run.  Here is a screenshot showing the virtual machine running in the Virtual Machine Manager and the GNOME Terminal session preparing to ssh into it:

3. Get the gpg key and setup the apt repositories. Run:
Arlington Career Center
$ wget http://archive.raspberrypi.org/debian/raspberrypi.gpg.key
$ sudo apt-key add raspberrypi.gpg.key
 Then set the contents of /etc/apt/sources.list to:
deb http://httpredir.debian.org/debian/ jessie main contrib non-free
deb-src http://httpredir.debian.org/debian/ jessie main contrib non-free
deb http://security.debian.org/ jessie/updates main contrib non-free
deb-src http://security.debian.org/ jessie/updates main contrib non-free
deb http://httpredir.debian.org/debian/ jessie-updates main contrib non-free
deb-src http://httpredir.debian.org/debian/ jessie-updates main contrib non-free
and set the contents of /etc/apt/sources.list.d/raspi.list to:
deb http://archive.raspberrypi.org/debian/ jessie main ui staging
# Uncomment line below then 'apt-get update' to enable 'apt-get source'
#deb-src http://archive.raspberrypi.org/debian/ jessie main ui
4. Install the PIXEL desktop. Run:
$ sudo apt update
$ sudo apt dist-upgrade
$ sudo apt install desktop-base pix-plym-splash
$ sudo apt install lxde dhcpcd-gtk
$ sudo apt install pi-greeter pi-package pimixer pipanel
$ sudo apt install raspberrypi-artwork raspberrypi-net-mods
$ sudo apt install raspberrypi-sys-mods raspberrypi-ui-mods
$ sudo apt install chromium
 After this, I exited from the ssh session and rebooted the virtual machine, again accessing it through the Virtual Machine Manager.  Here is what greeted me:
Logging in revealed:
After running LXRandR and tweeking the LXTerminal to my liking, I arrived at:

This is only a very rough process at this stage. The menus will require configuration to match what students see on both the Raspberry Pi and the Live image of Debian + PIXEL.

The next step for us at the Arlington Career Center will be to reach out to the Raspberry Pi community and see if we can begin contributing directly to the project. The OLPC Learning Club DC was the most exciting user group in which I've ever had the pleasure to participate.  It brought together an eclectic mix free software geeks, scientists, hobbyists, and parents with their young geniuses to be into the kind of gather that just leads to great things.  I'm hoping that the local Raspberry Pi community we are beginning to create can at least approach the magic of that experience.

Saturday, October 29, 2016

AP CS Principles - The College Board Gets It Right

Beginning this Fall, students in high schools across the United States were able to will be able take a new course - AP CS Principles.  I can't say I've always been a big fan of the College Board and the impact this very powerful institution has on education in my country. I have to say, however, that I think they got it right this time. From my experience thus far, I am a huge fan of the new CS Principles course.

Working with the NSF, the College Board has approved three on-line curricula for the launch this Fall:
Last Spring I used the Mobile CSP curriculum with students who were taking dual-enrolled CSC 200: Introduction to Computer Science with me through Northern Virginia Community College.  While I haven't researched the details of its history, it is obvious that CSC 200 was created by the Virginia Community College System (VCCS) to receive credits from the new AP CS Principles course.

As a free software activist of many years, I found little gems inside the Mobile CSP curriculum that let me know kindred spirits where involved in its creation:
This Fall I am again teaching CSC 200 using Mobile CSP. The more I use App Inventor the more I love it.  While I've been too busy to keep up with this blog of late, it is time to get back to more regular posting so I can document our experience this year with this wonderful new curricula.

Tuesday, August 30, 2016

My Annual Love Letter to SchoolTool

It is the end of August, and time once again for me to setup my SchoolTool instance for the coming school year. Each year for the last several years, I have sent an email to the SchoolTool mailing list expressing both my joy and my deep felt gratitude at the pleasure I experienced setting up my very own student information system (SIS).  Sadly, we may have come to the end of an era, and SchoolTool's days may be numbered, so I felt it more appropriate this year to express my gratitude here in my blog.

The reason I feel compelled to write a "love letter" to the SchoolTool developers each year is that they have made the very complex process of setting up an SIS smooth and painless, both by the design of the software itself, and by the wonderful SchoolTool Book written by English teacher and former project manager, Tom Hoffman.  It provides a model of what technical documentation should be, and the influence that the documentation process and the user interface design process had on each other is apparent. With nothing more than the book to guide me, I can create a school year, populate it with courses, sections, terms, time tables, instructors, students, and skills. In just a few minutes I am ready to start the new school year. The ease with which everything works is a total thrill!

I teach dual-enrolled high school / community college classes in a career and technical school in Arlington, Virginia. The SIS provided by Arlington Public Schools is not setup to properly handle the odd configurations of overlapping high school and college classes that I need to make my CS / IT program work.  SchoolTool provides me with a customizable SIS that meets my needs, while providing a host of added benefits to my students.  The CanDo Skills Tracking system lets students see their progress on the explicit skills they are expected to acquire in my classes. The SchoolTool Quiz component enables me to create custom tests and quizzes automatically linked to the skills tracking system.

SchoolTool will forever epitomize what free software means to me and why I've dedicated much of my energy over the past 20+ years fighting for software freedom. It was created in an open process with input throughout by the real users of the system.  I became one of those users back in the Summer of 2005, when I met Tom Hoffman at Pycon and began the collaboration that continues to this day. Both the CanDo and Quiz components were added at the initiative of a small group of us in Virginia, and students of mine contributed directly to the development of both components. There is still no other software, either free or proprietary, that does what SchoolTool does.

The development of SchoolTool was driven by the desire to provide use value and to create a tool to help change the world, specifically by positively impacting education in Africa and the developing world. Thanks to the sponsorship of Mark Shuttleworth, it was freed from the imperative of commodification for an extended period of time. It never could have developed the innovations it has otherwise.

Some big mistakes where certainly made along the way to SchoolTool's development, the biggest of which is probably building SchoolTool on a dead end web application framework, Zope 3, which has now isolated SchoolTool from the larger free software development community. That mistake may cause SchoolTool to follow its framework into abandonment. You never can tell with free software projects, however, since they can be taken up by anyone at any time who finds them useful.  Perhaps SchoolTool will find new life in some unexpected way, or perhaps some of its innovations will find their way into another free software SIS.

I am just happy that it will be available for at least the next several years on Ubuntu servers.  I plan to keep using it for as long as I can, since it is a tremendously effective resource to help my students monitor their learning, and since I get to experience the joy and excitement each year of setting it up!

Tuesday, July 19, 2016

Setting Up a RHCSA Practice Laptop - Part 1

In order to practice for the RHCSA at home, I took an old Dell Latitude E6500 with 4GiB of RAM and purchased a 500GiB hard drive on which I could install CentOS 7 with a server GUI as the base operating system and them multiple virtual machines using KVM with which to experiment and learn.

My package selection for the install was a Server GUI installation. I partitioned the hard drive with 1 GiB of swap, 500 MiB on a standard partition for the /boot, and 30 GiB for the root partition.

I also created a 60 GiB partition for /home, and then allocated everything that remained (375.27 GiB) to /var.  The reason for giving some much space to /var is that the default KVM / qemu setup on CentOS 7 places virtual hard drive images in /var/lib/libvirt/images, so I wanted plenty of space available for multiple images.

After the install finished I wanted to see what the partitions looked like, so I ran
$ sudo yum install system-storage-manager
and then
$ sudo ssm list
which revealed the following:

-----------------------------------------------------------------
Device        Free       Used      Total  Pool        Mount point
-----------------------------------------------------------------
/dev/sda                       465.76 GB              PARTITIONED
/dev/sda1                      500.00 MB              /boot
/dev/sda2  0.00 KB  465.27 GB  465.27 GB  centos
-----------------------------------------------------------------
--------------------------------------------------------
Pool    Type  Devices     Free       Used      Total
----------------------------------------------------
centos  lvm   1        0.00 KB  465.27 GB  465.27 GB
----------------------------------------------------
--------------------------------------------------------------------------------
Volume           Pool   Vol size  FS   FS size    Free      Type   Mount point
--------------------------------------------------------------------------------
/dev/centos/swap centos 1.00 GB                             linear
/dev/centos/root centos 30.00 GB  xfs  29.99  GB  26.73 GB  linear /
/dev/centos/home centos 60.00 GB  ext4 60.00  GB  55.88 GB  linear /home
/dev/centos/var  centos 374.27 GB ext4 374.27 GB 349.02 GB  linear /var
/dev/sda1               500.00 MB xfs  493.73 MB  293.59 MB part   /boot
--------------------------------------------------------------------------------                                                                          

To be continued in Fall of 2016..

Resources

Sunday, April 17, 2016

Moving an ArcGIS File Geodatabase to QGIS

I am taking GGS 553: Geographic Information System this semester at part of my graduate studies at George Mason University.  In a previous post I described how I ended up in this Geographic Information Science graduate certificate program, which I have now been pursuing for almost 2 years.  GGS 553 is a required course, and the first one in the program that has required me to use proprietary software, since much of the course is focused on learning to use ArcGIS.

I am both philosophically and ethically opposed to proprietary software, since it runs dead against the expansion of our shared cultural space, which I believe is vital to the survival of our species. This is a required course, however, and in the large scheme of things I am willing to compromise when I need to. I like to think of it as dancing with the devil, learning the devil's moves in order to be able to freely out dance him in the future. In this case that will mean applying what I learn in GGS 553 to mastering QGIS, the free software alternative to ArcGIS. I had intended to try to do each of our assigned labs this semester in both ArcGIS and QGIS, but when I found it difficult enough just to complete them on time in ArcGIS, I gave up on that idea after the first week.

This week we have a sort of half size assignment, so I thought I would use the extra time available to see if I could do it in QGIS.  The first challenge will be to load the project data into QGIS.  We were given the data in ArcGIS's file geodatabase format. QGIS can not yet read and write to this format directly, but there are tools available to convert it into PostGIS, with which QGIS can work well.

Last Summer I wrote a blog post documenting how I setup a PostGIS server on Ubuntu 14.04.  Since this year I am also needing to learn RHEL, I'll use this guide to setup the server on the little Centos 7 server I have at home for just such purposes, and then connect to it from QGIS running on my Ubuntu desktop.

Installing a PostGIS Server on Centos 7

$ sudo yum install postgis postgresql-server postgresql-contrib
$ sudo postgresql-setup initdb
$ sudo -i -u postgres
$ psql
postgres=# \password postgres
Enter new password: 
Enter it again: 
postgres=# \q
$ exit
$ sudo vi /var/lib/pgsql/data/pg_hba.conf

Change this line (near the bottom):

host    all             all             127.0.0.1/32            ident

to this:

host    all             all             0.0.0.0/0               md5

Next allow database connections from outside:

$ sudo vi /var/lib/pgsql/data/postgresql.conf

Change:

#listen_addresses = 'localhost'

to this:

listen_addresses = '*'

Create a new database user with superuser privileges:

$ sudo su - postgres
$ createuser --superuser [user]
$ psql -c "ALTER ROLE [user] PASSWORD '[password]'"
$ exit

Then as that user create the database and add gis extensions:

$ createdb webster
$ psql -d webster -c 'CREATE EXTENSION postgis'

Then after copying over the Webster.db directory containing the file geodatabase, I ran:

$ ogr2ogr -f "PostgreSQL" PG:"dbname=webster user=[user] password=[password]" Webster.gdb

After which I connected my desktop QGIS to the PostgreSQL server running on my little household server and loaded the three layers I found there:

Resources

Thursday, March 31, 2016

Software Management with YUM

YUM (Yellowdog Updater, Modified) is the package management tool used on Red Hat Enterprise Linux and its derived versions, CentOS and Scientific Linux. It acts as a front end to the RPM Package Manager (RPM), and is used to install, remove, and update software on Red Hat based systems.

I first encountered YUM when installing Yellow Dog Linux on PowerPC based Macintosh computers back at the dawn of the 21st century.  When I switched over to Debian based GNU/Linux systems with the release of Ubuntu in 2004, I completely lost touch with the RPM world until my Spring semester Linux System Administration course's pursuit of RHCSA certification brought me back into the fold.

I am writing this post to use as a handy list of the most common things I need to do when managing software:
  1. Update the software on the system
    $ yum check-update
    $ sudo yum update package_name
    $ sudo yum update [to update all packages]
    $ sudo yum group update group_name
    
  2. List all the currently installed software
    $ yum list installed
    $ yum list installed "global expression"
    
  3. Search for available packages
    $ yum list available "global expression"
    $ yum search term...
    
  4. Display information about a package
    $ yum info package_name
    
  5. Install a new package
    $ sudo yum install package_name
    
  6. Remove an existing package
    $ sudo yum remove package_name
    
  7. List the current repos
    $ yum repolist
    $ yum repolist -v
    
That covers the basics. I also need to learn how to clean up the cruft that accumulates over time as a system is run, in Debian land the kind of thing that would be done with $ sudo apt-get autoremove. It seems that in RPM space that is accomplished with the package-cleanup utility, so I'll look into that.

Resources

Saturday, March 19, 2016

Centos Command-line Tricks and Tips - Getting Rid of the Terminal Beep

Getting Rid of the Terminal Beep:

My terminal was making an annoying beeping (more like a swoosh beep, actually) every time it couldn't match a tab completion.  I like to listen to music while I work, so this was really driving me crazy.  All I needed to do to stop it was to run:
$ echo 'set bell-style none' >> ~/.inputrc
which appends 'set bell-style none' to the .inputrc file in my home directory.  .inputrc didn't exist in my home directory (I checked before running the command), so running this command created it.
After exiting the terminal and starting another, the terminal maintained the silence I wanted it to ;-)

Friday, February 19, 2016

Setting Up a Centos Router - Part 1


In order to run the kind of experiments we will need to run to really learn proper GNU/Linux system administration, we need our own "safe space" in which to play.  In previous years when I had students with the level of skills our ITN 170 group is quickly acquiring, I always used one of our machines as a NAT Router so that we could isolate our own network traffic and setup custom services within our private network space.

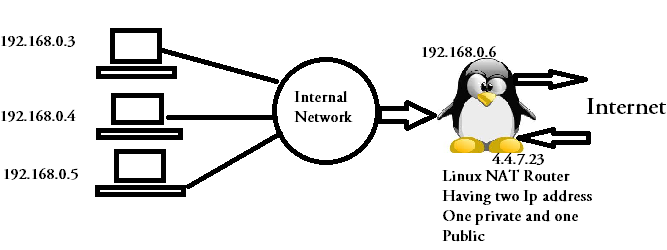
The basic idea is captured in the following illustration.
What is required is a machine with two NICs (represented here by Tux) - one which connects to the outside network and the other which connects to the local network.

Setup Process

Here is what I did to setup a basic router using an old desktop PC:

  • Did a minimal install of CentOS 7 on a machine with two NICs, connecting one of the NICs to the outside network and activating this connection using DHCP on the host network during the installation process.
  • Ran yum update after installation to make sure I had the current software.
  • Ran yum install yum-utils vim to get vim and the package-cleanup utility. I then ran package-cleanup --oldkernels --count=1 to remove all but the current kernel package.
  • I ran ip addr and got back information on three network interfaces:
    1. lo - the loopback interface or localhost, with its 127.0.0.1/8 network address.
    2. enp0s25 - the NIC on the motherboard which I had activated with DHCP during installation.
    3. enp3s0 - the addon NIC that was not configured during installation. It had the following information:
      enp3s0:  mtu 1500 qdisc pfifo_fast state UP qlen 1000
          link/ether 00:15:17:20:b6:e6 brd ff:ff:ff:ff:ff:ff
      
  • I edited /etc/sysconfig/network-scripts/ifcfg-enp3s0 adding the following:
    TYPE="Ethernet"
    BOOTPROTO="static"
    IPADDR="192.168.114.1"
    NETMASK="255.255.255.0"
    GATEWAY="x.x.x.x"  (place your gateway adress here)
    
I used the resources linked below to try to enable IP routing and NAT, but I was not successful in getting it to route.  I have a laptop running Centos 7 connected to the router machine.  Before attempting this setup I had installed ClearOS on the router and got it to route for the laptop with a setup process using ClearOS's web interface.  An experienced friend of mine shamed me into removing this, however, by telling me he would never hire a sysadmin who only new how to set this up using a web interface.

So for now I have assigned two of my students to continue looking into it, and I'll get together with that friend who shamed me into this to get his assistance on Tuesday if we haven't figured it out by then.

To be continued...

Resources

Monday, February 8, 2016

Text Processing and Unix History

Preparing for the RHCSA certification is turning out to be a heap of fun! Despite more than 20 years as a free software activist and personal user of GNU/Linux systems for all my personal computing, and despite being a computer science teacher during that same time, there are a wide range of basic Unix CLI skills that I only scratched the surface of in all that time (shame on me!).

Preparing for the RHCSA is providing the opportunity to address that deficit at long last.  Chapter 4 of the book we are using in class to study for the certification is titled "Working with Text Files". The most enjoyable thing about this investigation into Unix text file processing is the view it provides into Unix history.

In the beginning there was eded begat ex, and ex begat vi... Along the way we got cousins grep and sed too.  Since grep, sed, and vi are part of the Unix admin's toolset, I want to learn to use them at least well enough to be able to help prepare students (and myself) for the RHCSA certification and to be able to present them well to future students in my ITN 170: Linux System Administration class.

Since in the beginning there was ed, let me start with that.  I found a very nice blog post, Actually using ed, which I found to be a wonderful introduction to this tool.  I set myself the task of using ed to create a list of fruits in a file named fruits.txt.  The first thing I found out was that trying:
$ ed fruits.txt
did not create the file for me, instead returning a "No such file or directory" error.  So I did the following, which worked:
$ touch fruits.txt
$ ed fruits.txt
0
a
apples
bananas
pears
apricots
kiwis
blueberries
oranges
peaches
cranberries
blackberries
pinapples
teaberries
.
w
110
q
$
After that, I ran $ cat fruits.txt, and saw that everything was as I wanted it:
apples
bananas
pears
apricots
kiwis
blueberries
oranges
peaches
cranberries
blackberries
pinapples
teaberries
Now if I want an alphabetical listing of the fruits in my list, I can run:
$ grep berries fruits.txt | sort
and see this:
blackberries
blueberries
cranberries
teaberries
RegexOne is a nice, interactive tutorial for learning basic regular expressions.  I wanted to do all the exercises using grep on the command-line as well, and in the process setup a new github repo for resources related to our RHCSA study, here.

Next I wanted to learn sed.  Sed - An Introduction and Tutorial by Bruce Barnett is a wonderful tutorial.  With so much awful document out there, it is great to find something written by someone with a grasp of how people actually learn.

Using the fruits.txt file I created with ed, I ran $ sed s/berries/cherries/ fruits.txt and got:
apples
bananas
pears
apricots
kiwis
bluecherries
oranges
peaches
crancherries
blackcherries
pinapples
teacherries
Since sed uses the same substitution syntax that vim uses, learning it will be a big help in becoming a more effective vim user as well.

Saturday, February 6, 2016

QGIS Delivers Functionality and Freedom

I am taking a graduate course this semester, GGS 553 - Geographic Information System, which is required for the Graduate Certificate in Geographic Information Sciences program that I am hoping to complete.  I like the text book we are using for class, and greatly enjoyed the first lecture.  What I am not happy about is that the labs which will make up a large part of the course assignments require the use of proprietary software, specifically ArcGIS, and then by extension, the Windows operating system on which it runs.

I have been a free software activist for more than 20 years. Software for GIS makes it especially easy to state why I believe so strongly in software freedom. To put it simply, I believe software should be part of humanity's shared cultural heritage, and that all efforts to turn it instead into a commodity are immoral.

Installing ArcGIS made this painfully clear to me.  In the first place, using it required that I use a non-free operating system, so I am running Windows just so that I can use ArcGIS.  Going through the gymnastics (registering an on-line account, figuring out where to enter the product code after missing it the first time through the installation, etc.) required to establish that I was "authorized" to use the commidified resource was most unpleasant. It rubs me deeply the wrong way to see human creativity misspent making the world a worse place rather than a better one.

No matter.  I have to do it to complete this required course, so I am determined to make the best of it.  What that means to me is keeping in mind the well known quote from Sun Tzu,
"Know your enemies and know yourself, you will not be imperiled in a hundred battles."
So I'll count learning ArcGIS as knowing my enemy, and time permitting, I will do each lab assignment in QGIS in parallel.

The first thing I wanted to do was to install the latest QGIS on my Ubuntu 14.04 desktop.  To do this, using this web page as a guide, I added the following to the end of my /etc/apt/sources.list file:

# For QGIS 2.12
deb http://qgis.org/ubuntugis trusty main
deb http://ppa.launchpad.net/ubuntugis/ubuntugis-unstable/ubuntu trusty main


Then I ran:
$ sudo apt-key adv --keyserver keyserver.ubuntu.com --recv-key 3FF5FFCAD71472C4
$ sudo aptitude update
$ sudo aptitude install qgis
This is a much easier process than installing ArcGIS. QGIS also runs much faster than ArcGIS, and on the operating system I choose, not the one chosen for me.

It also seems that the wonderful folks who have developed QGIS have modeled its UI after the non-free standard, so the lab notes describing ArcGIS helped me understand QGIS as well. QGIS's Browser is the equivalent of ArcGIS's ArcCatalog. Here is the QGIS Browser showing the shape files from my first lab:
The QGIS Desktop functions like ArcGIS's ArcMap.  Here is QGIS Desktop with my Lab 1 shapefiles in a map:
So far, so good.  I was able to answer all the lab questions using QGIS with the given data, and I learned new things about QGIS through doing the ArcGIS lab exercises.

Thursday, January 28, 2016

Creating a Shared Partition Between Ubuntu and Scientific Linux

Now that I've removed Windows from my desktop computer at work, and installed Scientific Linux in its place (note: it was, Centos 7.2 with LVM partitions, but now it is Scientific Linux 7.1 with standard partitions), I decided I needed a partition that could be shared between the two distros for large user data.

For example, I have 12 Gigabytes in my Music directory, and a number of VirtualBox hard disk images (at 20 to 30 Gigabytes each) that I would like to access from both OS's.  So my plan is to create a new partition which I will mount on /media/share on both Ubuntu and Scientific Linux.  Then I'll make symbolic links from /home/[username]/Music to /media/share/Music from each home directory.

Before I could create a new partition, I needed to shrink one of my existing partitions to free up space.  Here is how the partitions looked when I started:
and here is what they looked like after shrinking /dev/sda3, growing /dev/sda4 and inserting /dev/sda7 into the new space inside it:
I made the change by booting my computer from an Ubuntu 14.04 Live DVD and running GParted. It took about 20 minutes to shrink my home partition, but it worked without incident.

The next step is to add a mount for the new /dev/sda7 partition.  It's been several years since I played around with mounting partitions, but I still remembered that it involved editing the /etc/fstab file and adding the device and the mount point.  So I loaded my /etc/fstab file and noticed something had changed since I last looked at it:
# /etc/fstab: static file system information.
#
# Use 'blkid' to print the universally unique identifier for a
# device; this may be used with UUID= as a more robust way to name devices
# that works even if disks are added and removed. See fstab(5).
#
# <file system> <mount point>   <type>  <options>       <dump>  <pass>
# / was on /dev/sda2 during installation
UUID=4ae26245-fe59-40d2-a380-2c2de57b652b /               ext4    errors=remount-ro 0       1
# /home was on /dev/sda3 during installation
UUID=5c4e86f6-1d94-4eab-9931-5d3aa29e1583 /home           ext4    defaults        0       2
# swap was on /dev/sda1 during installation
UUID=bba8f235-d8b0-4131-9a3e-ec286c3b3837 none            swap    sw              0       0
I was completely unfamiliar with UUID, and had been expecting to see device names (like /dev/sda3 etc.) instead.  I bit of searching led me to several links:
Running $ sudo blkid gave me this:
 /dev/sda1: UUID="b70d7272-e47f-426a-a979-5417bb2f7801" TYPE="swap"
/dev/sda2: UUID="4ae26245-fe59-40d2-a380-2c2de57b652b" TYPE="ext4"
/dev/sda3: UUID="5c4e86f6-1d94-4eab-9931-5d3aa29e1583" TYPE="ext4"
/dev/sda5: UUID="76f8dd02-3671-49ba-b75a-da6d8bb65b19" TYPE="ext4"
/dev/sda6: UUID="e7e58de9-a748-4500-b300-ae1ca10f2056" TYPE="xfs"
/dev/sda7: UUID="44244888-7000-49bf-8ac8-2c32e2f73eb5" TYPE="ext4" 
which I used to add the following line to /etc/fstab:
UUID=44244888-7000-49bf-8ac8-2c32e2f73eb5 /media/share ext4 defaults
and then ran:
$ sudo mkdir /media/share
$ sudo mount -a
which mounted /dev/sda7 on /media/share. Next I moved all my music files to /media/share/Music, deleted the Music directory in my home directory, and replaced it with a symbolic link (note: run from my user's home directory):
$ ln -s /media/share/Music Music
I started Rhythmbox and it worked as if nothing had changed.

Rebooting into Scientific Linux, I added the same line to /etc/fstab and ran the same mkdir and mount commands, then removed my still empty Music directory, made the same sym link, and voila, I had access to all my music from Scientific Linux (after installing Rhythmbox, that is).

For VirtualBox VM sharing, things are a bit more complicated.  Ubuntu makes installing VirtualBox trivial, since it is in the main repository, but on Ubuntu 14.04 version 4.3 is what you get.  On Scientific Linux I installed version 5.0 using the instruction from an earlier post.

Fearing there might be meta-data conflicts between the two versions, but feeling confident the virtual hard disk image files (.vdi) could be shared between them without conflict (since I regularly copy these files back and forth between distros without problems), I did the following:
  1. On the Ubuntu side, I moved my entire VirtualBox VMs directory from my home directory to /media/share and sym linked to it as I had done with the Music directory.
  2. On the Scientific Linux side, I kept VirtualBox VMs in my home directory, using sym links only for the virtual disk image files.  For example, from inside $HOME/VirtualBox VMs/Server1 I ran:
    $ ln -s /media/share/VirtualBox\ VMs/Server1/Server1.vdi Server1.vdi
This worked nicely.  Just for fun, I ran yum update on Server1 launched from VirtualBox 5.0 on Scientific Linux, then rebooted into Ubuntu 14.04 and relaunched Server1 from there, seeing changes I had made.

Finally, after noticing that VirtualBox-4.3 was available for Scientific Linux 7.1, I ran # yum remove VirtualBox-5.0 and then # yum install VirtualBox-4.3, made the VirtualBox VMs directory in my home directory a sym link to /media/share/VirtualBox VMs and quickly added all the VMs back.  Now even the VMs with the VirtualBox extensions installed (for full screen GUI and auto mouse capture) work on both OS's.

Saturday, January 23, 2016

Thonny - A Python IDE for Beginners

I received an email a few days back from Aivar Annamaa about a Python IDE for beginners called Thonny.

The YouTube video introducing the IDE looks promising, so I am jumping at the opportunity to take a look at it.

Thonny is in the Python Package Index, so it can be easily installed (and installed by user without system admin privileges) using pip.  In a previous post I documented installing Python 3.4, which is required to before what follows.

First I want to get pip3.  Since it is not yet in the main Centos repository, I installed it with (note: run $ sudo -i and then # exit before running this command in the same terminal emulator so as not to be prompted for a sudo password):
$ curl https://bootstrap.pypa.io/get-pip.py | sudo python3.4
I want to install Thonny inside the user's local directory, so I installed it with:
$ pip3 install --user thonny
This installs the thonny egg in $HOME/.local/lib/python3.4/site-packages (creating the needed lib/python3.4/site-package directory if it is not already there), and installs a shell script to launch it in $HOME/.local/bin. When I tried running thonny from the command prompt, I got an error message: ImportError: No module named 'tkinter'. So I needed to install tkinter:
$ sudo yum install python34-tkinter
after which thonny launched.  It complained that it couldn't find rope or jedi, however, so I installed those locally as well:
$ pip3 install --user rope
$ pip3 install --user jedi
Since thonny is a GUI IDE, I wanted a GUI launcher for it.  To get one I created a Thonny.desktop file based on the one I found here, with the following contents:
[Desktop Entry]
Type=Application
Name=Thonny
GenericName=Python IDE
Exec=/home/[username]/.local/bin/thonny %F
Comment=Python IDE for beginners
Icon=/home/[username]/.local/lib/python3.4/site-packages/thonny/res/thonny.ico
Terminal=false
Categories=Application;Education;Development;Debugger;IDE;
MimeType=text/x-python;
Actions=Edit;

[Desktop Action Edit]
Exec=/home/[username]/.local/bin/thonny %F
Name=Edit with Thonny
and placed it in my /home/[username]/.local/applications directory (Note: replace [username] with your actual username).

Here is a screenshot of Thonny running hello.py:
My next task will be to go through some beginner Python lessons using Thonny to see how it feels.

Thursday, January 21, 2016

Resizing a Logical Volume on Centos 7.2 with system-storage-manager

My desktop machine at work was setup to dual-boot Ubuntu 14.04 and Windows 10.  Deciding I needed Centos 7.2 much more than Windows 10, I installed Centos into the space that had been occupied by Windows.

Using the Centos 7 installation DVD, I followed the partitioning proceedure that I can now almost do in my sleep, creating the following partitions:
  1. 500 MiB /boot with an xfs file system on an actual partition
  2. 1024 MiB swap
  3. 20 GiB / with an xfs file system on a logical volume
  4. /home with whatever space is left with an ext4 file system on a logical volume
I said I could almost do this in my sleep. I made one huge mistake.  Instead of making the /home partition with GiB, I made it with MiB!  I didn't notice this until I got a warning about the home partition running out of space.  I had spent a lot of time already installing and then updating the system.  I didn't want to go through that again.

So I used this mistake as an opportunity to explore resizing my logical volume.  It took a bit of poking around, but eventually I found this webpage, from which I did the following:
  1. Logged into the GUI as root so that /home would not be in use.
  2. Ran yum install system-storage-manager to install ssm.
  3. Ran ssm list to see my volumes.
  4. Ran ssm resize -s [size] [volume] to make /home larger.
It worked like a charm, and now I'm logged back in with my regular user with a few hundered gigabytes of space in my /home partition.

Wednesday, January 20, 2016

Setting Up a Home Centos 7 Server

I have a little Zotac Zbox server at home that I've been running for several years with Ubuntu server.  It has a 500 GiB hard drive, 2 Gigs of RAM, and a dual-core 1.8 GHz Atom processor.  It is small, quiet (silent, actually) and sits unobtrusively on a shelf. It is truly a wonderful little device, and I've made good use of it for learning server administration in a safe and inexpensive way. DynDNS provides me with a domain name that I can use to access it from the outside world since it is sitting at home on my Comcast connection.

Since I am preparing for the RHCSA this Spring, I figured I should install Centos 7 on it. To do the install, I needed to connect it to a monitor, keyboard, and mouse. I setup the following LVM partitions:
/boot 500 MiB xfs
swap 1 GiB
/ 20 GiB xfs
/var 197 GiB ext4
/home 241 GiB ext4
and did a minimal install, then ran:
# yum update
# yum install net-tools
# yum install vim
The next task was to configure it to have a static IP address, after which I could unplug it from the monitor, keyboard, and mouse and put it back on the shelf. To set a static IP address, I used this and this web pages as guides.  I ran:
# vi /etc/sysconfig/network-scripts/ifcfg-ens32
and changed:
TYPE="Ethernet"
BOOTPROTO="dhcp"
DEFROUTE="yes"
PEERDNS="yes"
PEERROUTES="yes"
IPV4_FAILURE_FATAL="no"
IPV6INIT="yes"
IPV6_AUTOCONF="yes"
IPV6_DEFROUTE="yes"
IPV6_PEERDNS="yes"
IPV6_PEERROUTES="yes"
IPV6_FAILURE_FATAL="no"
NAME="ens32"
UUID="aed7d424-7293-4db7-8a89-c25f77557bf9"
DEVICE="ens32"
ONBOOT="yes"
to:
TYPE="Ethernet"
BOOTPROTO="none"
DEFROUTE="yes"
IPV4_FAILURE_FATAL="no"
IPV6INIT="yes"
IPV6_AUTOCONF="yes"
IPV6_DEFROUTE="yes"
IPV6_FAILURE_FATAL="no"
NAME="ens32"
UUID="aed7d424-7293-4db7-8a89-c25f77557bf9"
DEVICE="ens32"
ONBOOT="yes"
HWADDR="00:01:2e:bd:15:e3"
IPADDR="10.0.0.254"
PREFIX="24"
GATEWAY="10.0.0.1"
DNS="10.0.0.1"
IPV6_PEERDNS="yes"
IPV6_PEERROUTES="yes"

I tested that I could connect to the new server from outside, and it worked, but it actually took more than 2 minutes to connect.  I'll have to look into why that is.


Symlinking python3 to python3.4


Next I installed Python 3.4 (since what use is a computer without Python 3?) using the steps I described in my previous post.

To be able to type python3 instead of python3.4 to launch this version of Python, I made a symbolic link.  First I took a look at the .bash_profile file, which contained the following:
# .bash_profile

# Get the aliases and functions
if [ -f ~/.bashrc ]; then
        . ~/.bashrc
fi

# User specific environment and startup programs

PATH=$PATH:$HOME/.local/bin:$HOME/bin

export PATH
.local/bin is being added to the PATH, but I didn't yet have this directory, so I made it and then changed directories to it:
$ mkdir .local$ mkdir .local/bin
$ cd .local/bin
from here I ran:
$ which python3.4
to find out where it was located, and then made the symlink:
$ ln -s /usr/bin/python3.4 python3
after which I could launch Python 3 they way I wanted, as the following screenshot shows:


Saturday, January 16, 2016

Installing Python 3.4 on Scientific Linux

I  do a lot with Python in my cs program, and as an active member of the python community, I heeded the BDFL's request years ago to make the switch to Python 3.

So it was a bit disconcerting to find that Python 3 was not installed on Centos 7.  Fortunately, after a few false starts, I found that it is now very easy to add it:
# sudo yum install epel-release
# sudo yum install python34
You need to start this with
# python3.4
rather than
# python3
No matter, this will provide a nice opportunity to talk about symlinks with my students (note: I document how to make this symbolic link in my next post).

I decided to install Scientific Linux on the last available machine in our lab, just so we can have a look at it.

Here it is with python 3.4 running:
From a first look it seems to very compatible with Centos 7 / RHEL.  Our textbook mentions that it would be OK to use it to prepare for the RHCSA.  Now we have a box running it to play with.

Thursday, January 14, 2016

Installing VirtualBox on Centos 7

Last post I described how to install VirtualBox Guest Additions on Centos 7.  Since we are now running Centos 7 as the host operating system on several machines in our IT lab, we will also need to install VirtualBox itself on these machines, so that we can run VMs for testing that are hosted on the Centos boxes.

Here is how to do that (Note: be sure you are running the latest kernel before you start, and thanks to this post):
# cd /etc/yum.repos.d/
# wget http://download.virtualbox.org/virtualbox/rpm/rhel/virtualbox.repo
# yum install epel-release
# yum install dkms
# yum install VirtualBox-5.0
VirtualBox will now appear in the Applications -> System Tools menu.

Before individual users can create VMs, they have to be added to the vboxusers group with:
# usermod -a -G vboxusers [user name]
 Users added to the group can now start VirtualBox and install VMs.